In this post, I’ll show you how to build a simple, inexpensive laser communicator in which you can safely send a wireless data signal over a laser beam. We will build a transmitter and a receiver, and the setup will operate very much like a radio station, except that we will send the signal over a laser beam rather than a radio wave.
There are many ways to make a laser communicator, and a quick search online will reveal a number of good resources. I like this particular set up because the parts are inexpensive and easy to find, and it doesn’t require any soldering.
Suggested Parts List:
- Encapsulated solar cell with red and black leads: https://www.amazon.com/Velleman-Encapsulated-Solar-Cell-200mA/dp/B000S0N158/ref=as_li_ss_tl?ie=UTF8&qid=1383691966&sr=8-4&keywords=solar+cell&linkCode=sl1&tag=rk2p-20&linkId=a7a271f4ab3513f23af7bdfd9a48ca72
- 3-cell 1.5-V battery pack with red and black leads: https://www.amazon.com/Gino-Leads-Switch-Battery-Holder/dp/B00CQKCQFO/ref=as_li_ss_tl?ie=UTF8&qid=1383693096&sr=8-1&keywords=3+AA+battery+holder&linkCode=sl1&tag=rk2p-20&linkId=298b297e7ae5d3e9e28cac7bb2e43c03
- laser pointer with single, inside spring coil: http://www.scitoyscatalog.com/product/LASER.html
- audio amplifier: https://www.radioshack.com/products/radioshack-mini-audio-amplifier
- audio output transformer: https://www.radioshack.com/products/radioshack-audio-output-transformer
- two 1/8″ – 1/4-inch” male-to-male mono cables: https://www.amazon.com/Hosa-Cable-CMP105-Inch-TRS/dp/B000068O3F/ref=as_li_ss_tl?ie=UTF8&qid=1383695269&sr=8-3&keywords=mono+cable&linkCode=sl1&tag=rk2p-20&linkId=301fd554f997514f11141aa53c739a3a
- seven end-to-end alligator-clip leads: https://www.amazon.com/Velleman-Encapsulated-Solar-Cell-200mA/dp/B000S0N158/ref=as_li_ss_tl?ie=UTF8&qid=1383691966&sr=8-4&keywords=solar+cell&linkCode=sl1&tag=rk2p-20&linkId=a7a271f4ab3513f23af7bdfd9a48ca72
- wire cutter/splicer
- three AA batteries
- one 9-volt battery
- screwdriver
- sound source, such as a radio, phone, computer, microphone
PART I: BUILD YOUR TRANSMITTER
Parts Needed: laser pointer, battery pack, 3 AA batteries, audio output transformer, wire cutter/splicer, five alligator-clip leads, 1/4″ to 1/8″ mono cable.
Step One:
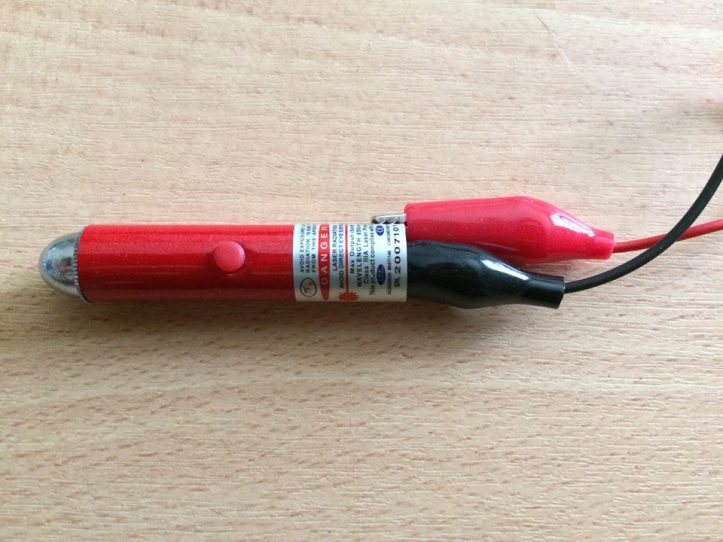
Remove the rear cap of your laser pointer and take out any button cells (watch batteries) that might have been included with it. Locate the single spring coil inside. Connect one end of your alligator-clip lead to this spring. I recommend using a black-colored lead for ease in identification. You’ll need a fairly short-barreled laser pointer in order to easily reach the spring inside and secure it with your clip. The link recommended above will provide a good laser pointer for this, but a simple “cat toy” laser from a discount store will also work. Be careful not to dislodge the spring. The parts inside are rather delicate. Next, using a recommended red-colored lead, connect one end of your lead to the outside barrel of the laser. This will act as a ground for it.
Step Two:
Now, we will connect both the laser pointer and the audio output transformer to the power supply (battery pack). This project requires 4.5 volts. Insert 3 “AA” batteries into your 3-cell battery pack and make sure the pack’s switch is set to “off.” (You could also user a jumper wire if working with a 4-cell battery pack or with two 2-cell packs, but a 3-cell pack with red and black connecting leads is the simplest method. Also, for best performance, choose 3 “AA” batteries rather than 3 “AAA” batteries, since “AA” batteries will produce more energy but not so much voltage as to damage your equipment.)
Notice that your audio transformer has five different-colored wires: red, black, white, blue and green. Notice also that your battery pack has a black and red wire, and notice that you have the unconnected ends of your black and red leads coming from the laser pointer. Connect them all as follows:
- Take the loose (unconnected) end of your red ground lead coming from the laser pointer and connect it to the red wire of your battery pack.
- Next, take the black wire which is connected to the spring inside your laser pointer and connect its loose end to the red wire of the audio transformer.
- Now, using a new lead wire, connect the black wire of the battery pack to the white wire of the audio transformer.
- You have now connected power to both your laser pointer and your audio transformer. Switch on the power from your battery pack, and go ahead and test your laser. It should turn on and off at will. If not, recheck your connections. If it works, turn off your battery pack again as we move to Step Three.
Step Three:
Now we will connect your audio transformer to the audio mono cable that will eventually connect to your sound source. Your mono cable should have a jack/plug on each end: one side a smaller 1/8″ jack (standard size for most phones, computers, etc.) and a larger 1/4″ jack on the other end.
- First, prepare your audio cable. Using a wire cutter or heavier pair of scissors, cut off the larger, 1/4″ metal jack head so that only the wire cable on that side remains. (Do NOT cut the smaller 1/8″ jack head off from the other side–you will need that to plug into your music/sound source). On the side where you made the cute, using your wire strippers, strip away about an inch length of the insulating outer plastic or rubber material. This will reveal two distinct strands of wires inside. One of the strands may still be wrapped in a thin plastic layer of additional insulation. Go ahead and strip that away, too, so that only two braids/strands of wire remain.
- Next, you will need two more connecting alligator-clip leads so that you can connect the audio transformer to your mono cable. Using a new lead with alligator clips, connect the green wire of the audio transformer to one of the strands/braids of wire on your mono cable (it won’t matter which one). Using a second lead, connect the blue wire of the audio transformer to the other strand/braid of wires on your mono cable.
- Note: the black wire of your audio transformer will not be connected to anything. For this project, that’s fine and not a problem.
- Once again, turn your battery pack back on and test your laser pointer to make certain that it still works. It should continue to turn on and off for you without problems. If not, again, double check your connections.
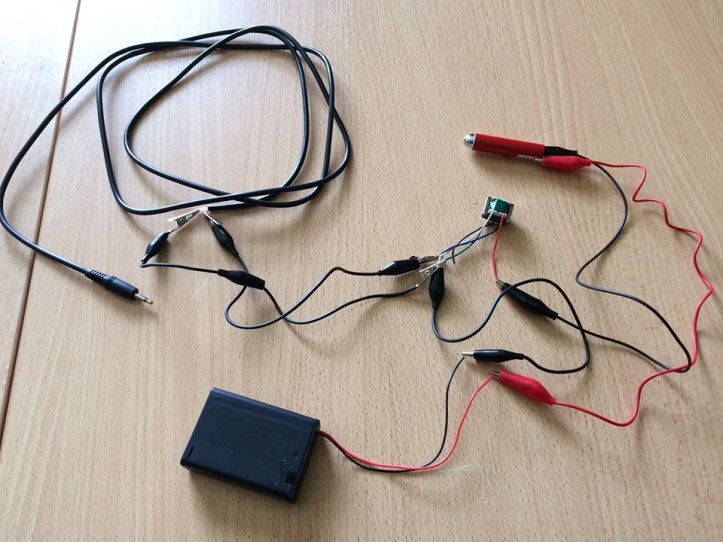
- Your transmitter is now complete, and should look like this:
PART II: BUILD YOUR RECEIVER
Parts Needed: encapsulated solar cell with red and black wire leads, two alligator clip leads, audio transmitter, 9-volt battery, wire cutter/stripper, screwdriver, and 1/8″ to 1/4″ mono audio cable.
Step Four:
- Prepare your second audio mono cable the way you did the first, by removing the 1/4″ jack head, stripping off the insulation and revealing two strands/braids of wires inside.
- When finished, plug the 1/8″ jack end of your mono cable into the audio amplifier.
- If needed, insert a 9-volt battery into your audio amplifier by removing the back cover with a screwdriver. Turn the device on and off to make certain that it works. When finished, turn it off.
- Now, using your alligator-clips lead wires, connect the red wire from the solar cell to either strand/braid of wires on your mono cable (again, it does NOT matter which one you choose).
- Finally, using your second alligator-clip lead, connect the black wire of the solar cell with the remaining strand/braid of wires from the mono cable.
- When finished, your transmitter should look like this:

PART III: FINAL TEST
You are now ready to test your laser communicator.
- First, power up your devices. For your transmitter equipment, turn on the battery pack. For your receiver equipment, turn on your audio amplifier and put the volume up high. You should hear some static for now, which is fine. Everything is working!
- Check one last time to make sure that your laser pointer is working.
- Next, get your music or sound source, whether it comes from your mobile device, computer, microphone, radio, etc. Make sure the volume on your device is turned up, and start playing the music. Connect your device to the audio cable of your transmitter equipment. You should hear nothing now because of this connection.
- Time to make it work! Finally, aim your laser pointer directly at the solar cell and turn it on. You should hear the sound/music playing now, coming from the audio amplifier on the receiver end. You can turn the sound on and off by turning the laser on and off.
Congratulations! You’ve just built a laser communicator and sent information wirelessly by means of a laser beam!
How It Works
Basically, when the sound waves are emitted from your music device, they are captured and sent through your connections to the audio transformer which literally transforms the sound waves into electrical impulses or signals by reading or sampling the amplitude, strength and duration of the various pulse waves. These signals are then sent, as they arrive, directly to your laser pointer. Instead of shining an ordinary “steady” laser beam of light, your laser pointer is now flickering on and off multiple times a second, in perfect synchronization with the pulses being sent to it that mimic the changing patterns of the sound waves. This is all happening so fast, however, that our eyes can’t see the laser light flashing on and off repeatedly. Instead, all we perceive is a steady beam of light. This beam of light is then sent to the solar cell when we aim the laser pointer at it. The solar cell captures each of these flashing on-and-off signals and transmits this data to the audio amplifier. The amplifier essentially rectifies these electric pulse signals and translates them back into amplified waves. We then hear these waves, reconstructed as sound waves, coming from the amplifier: identical to the music being sent from our transmitting device.
Click here to see a video of the set in action: https://www.facebook.com/kim.craft.520/videos/1951013811590695/
Resources:
R. Kharawala, How to Make a Laser Communicator [Tutorial], (2013). Available: https://www.youtube.com/watch?v=jvrXXQGXYg4.
Weekend Project: Make a Simple Laser Communicator, Make Magazine (2009). Available: https://www.youtube.com/watch?v=HKRPfa66_po.
A.V. Oppenheim, Signals and Systems (2nd ed.), Pearson (1996).
S. Quellen Field, Simple Laser Communicator, O’Reilly Media (2008). Available: http://cdn.makezine.com/make/lasercomm.pdf
